Inventory User Guide
Follow illustrated instructions for inspecting deliveries, managing warehouse stock, and tracking outgoing orders.
- QC inspects the vendor delivery
- Warehouse receives, packs, and ships
- CS requests dispatch and tracks delivery
Screenshots use sample data and show the Indonesian interface. Select any image to open it at full size in a new tab.
Quality Control (QC)
Back to top-
Create one inspection ticket for the vendor
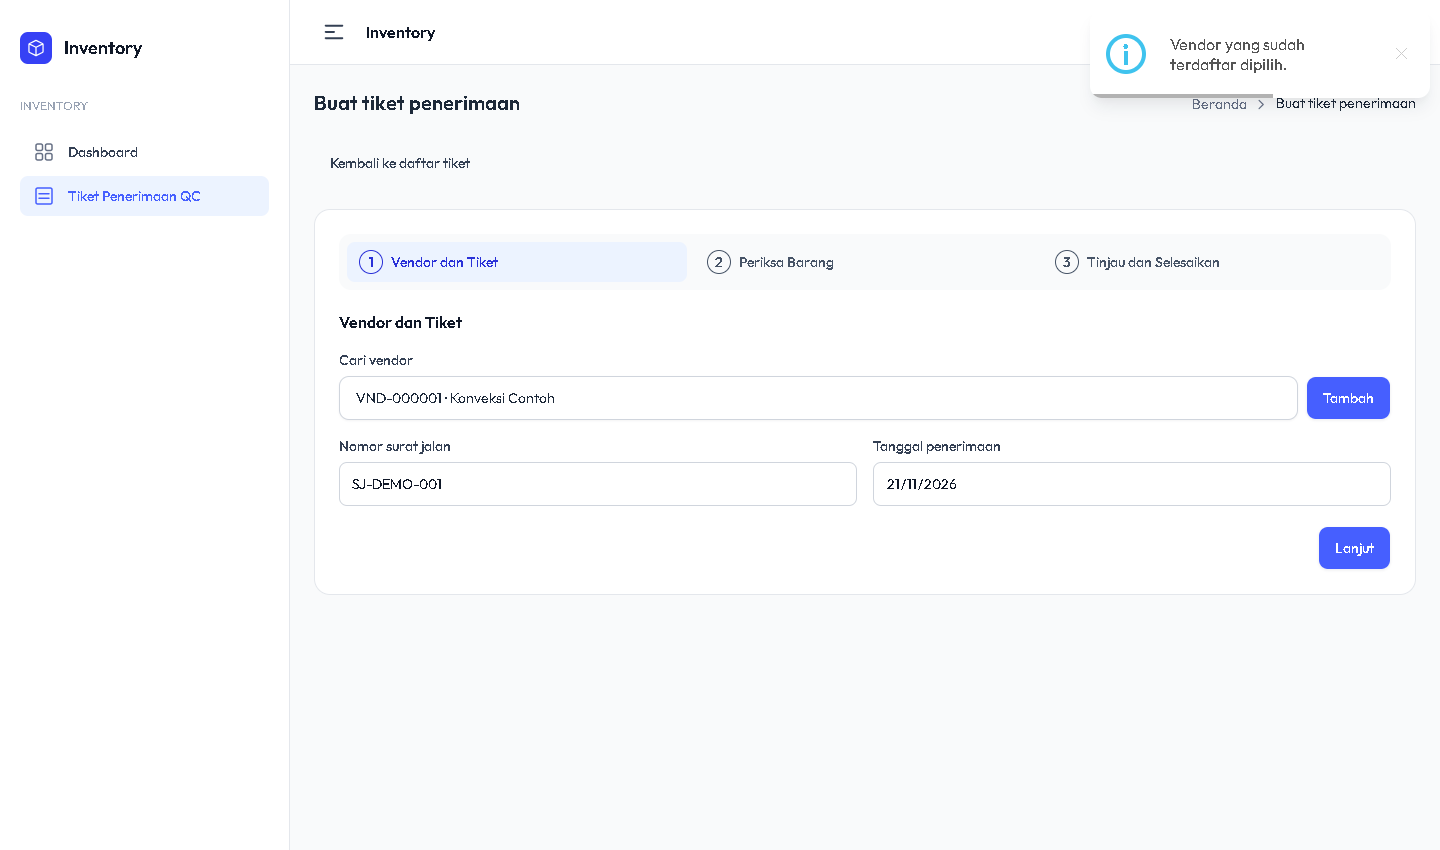
From the QC dashboard, select Create Inspection Ticket. Search by vendor ID or name. If the vendor is missing, select Add, enter the name, and save it to get a vendor ID. Enter the delivery note number and arrival date, then select Next. Create separate tickets for separate vendors.
 (opens in a new tab)
Vendor selected and delivery note entered 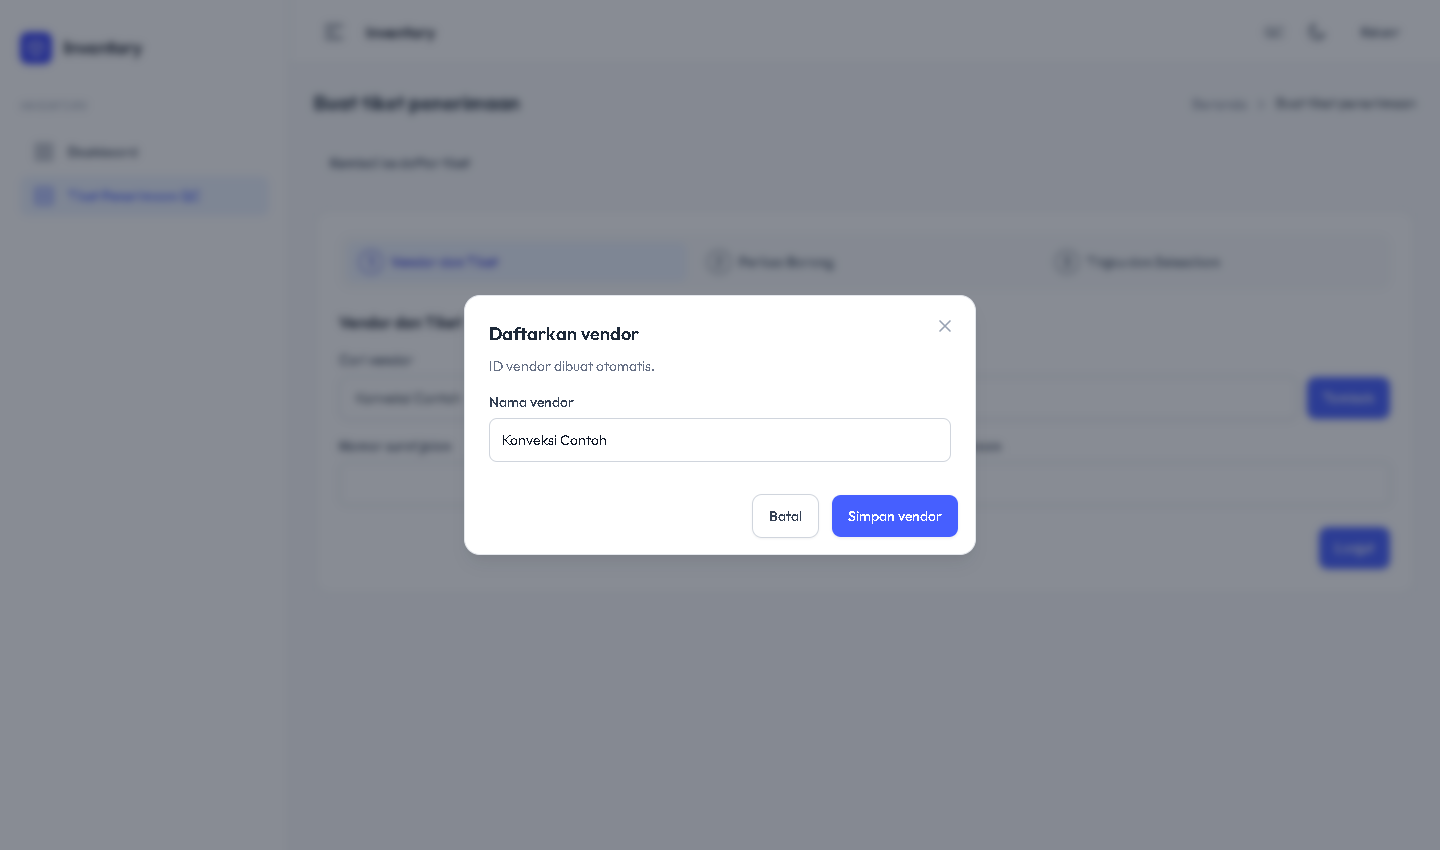 (opens in a new tab)
Form to register a new vendor -
Add products and record the inspection
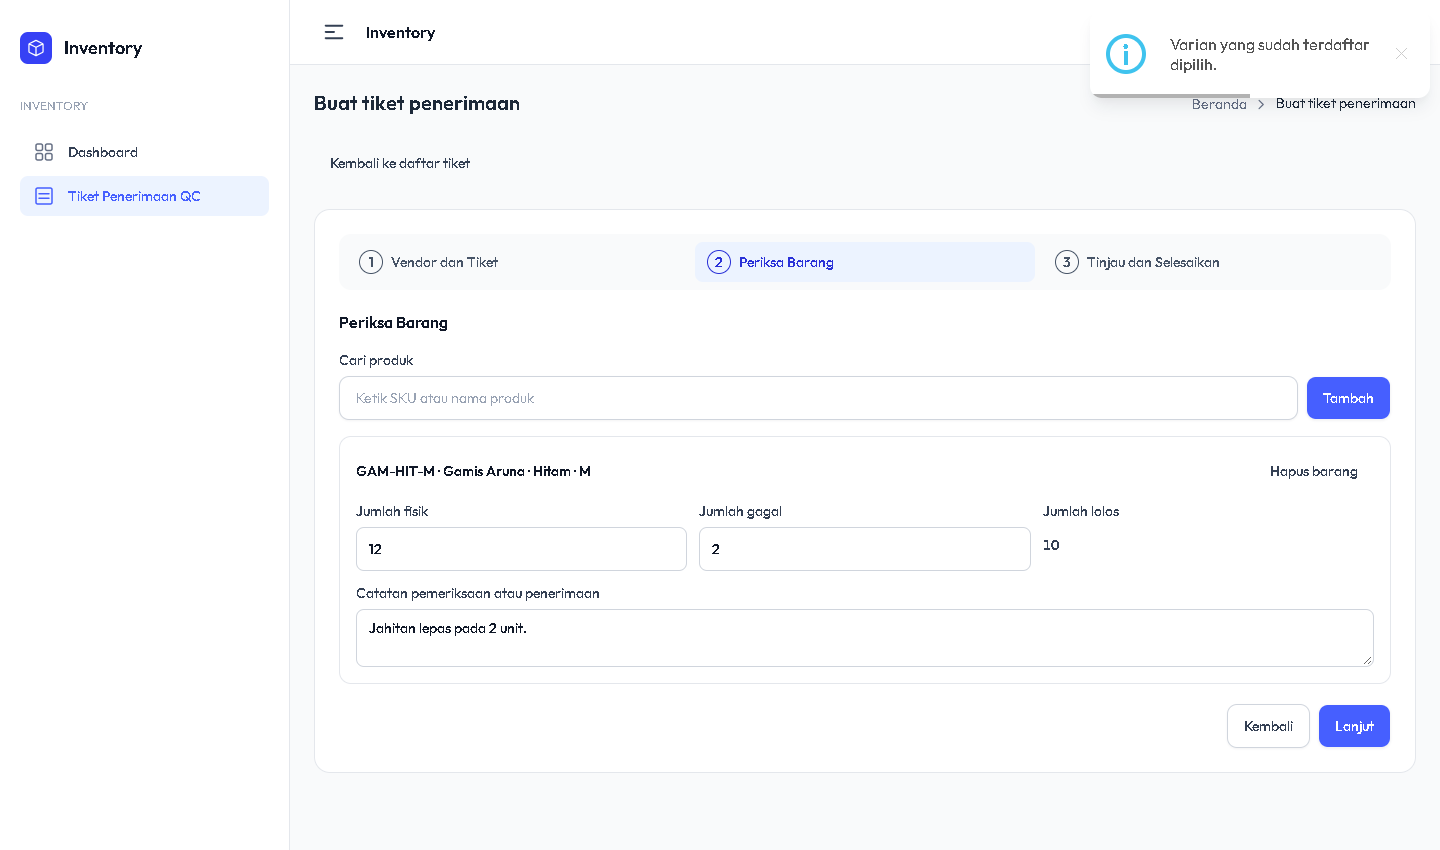
Search by SKU or product name, select the variant, then select Add to ticket. Use Add beside the search to register a new model, color, and size. Enter the physical quantity, failed quantity, and notes. Inventory calculates the number of units that passed.
 (opens in a new tab)
Physical quantity, failed quantity, and QC notes 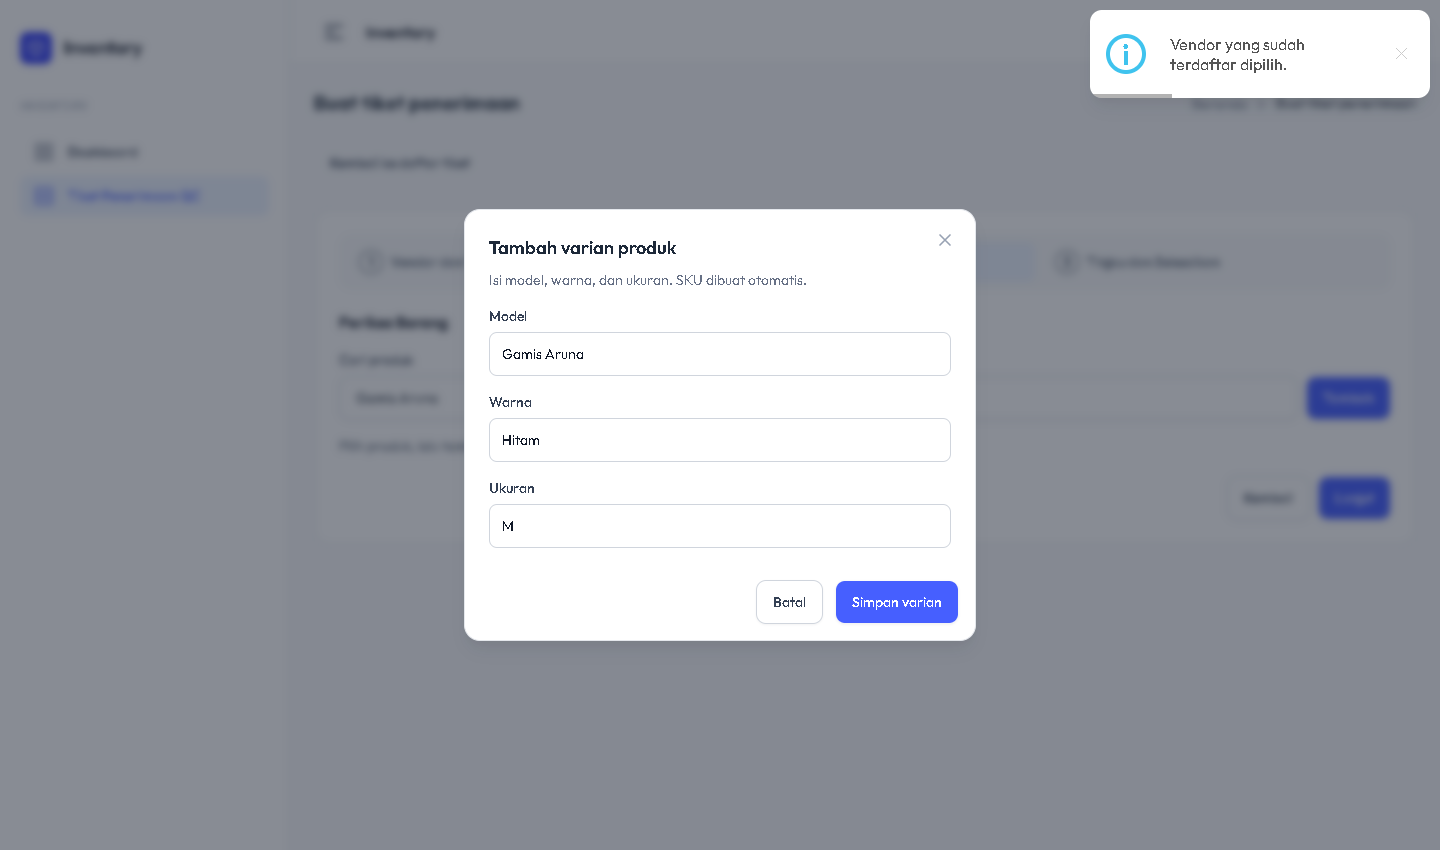 (opens in a new tab)
Form to add a product variant -
Review the quantities and complete the ticket
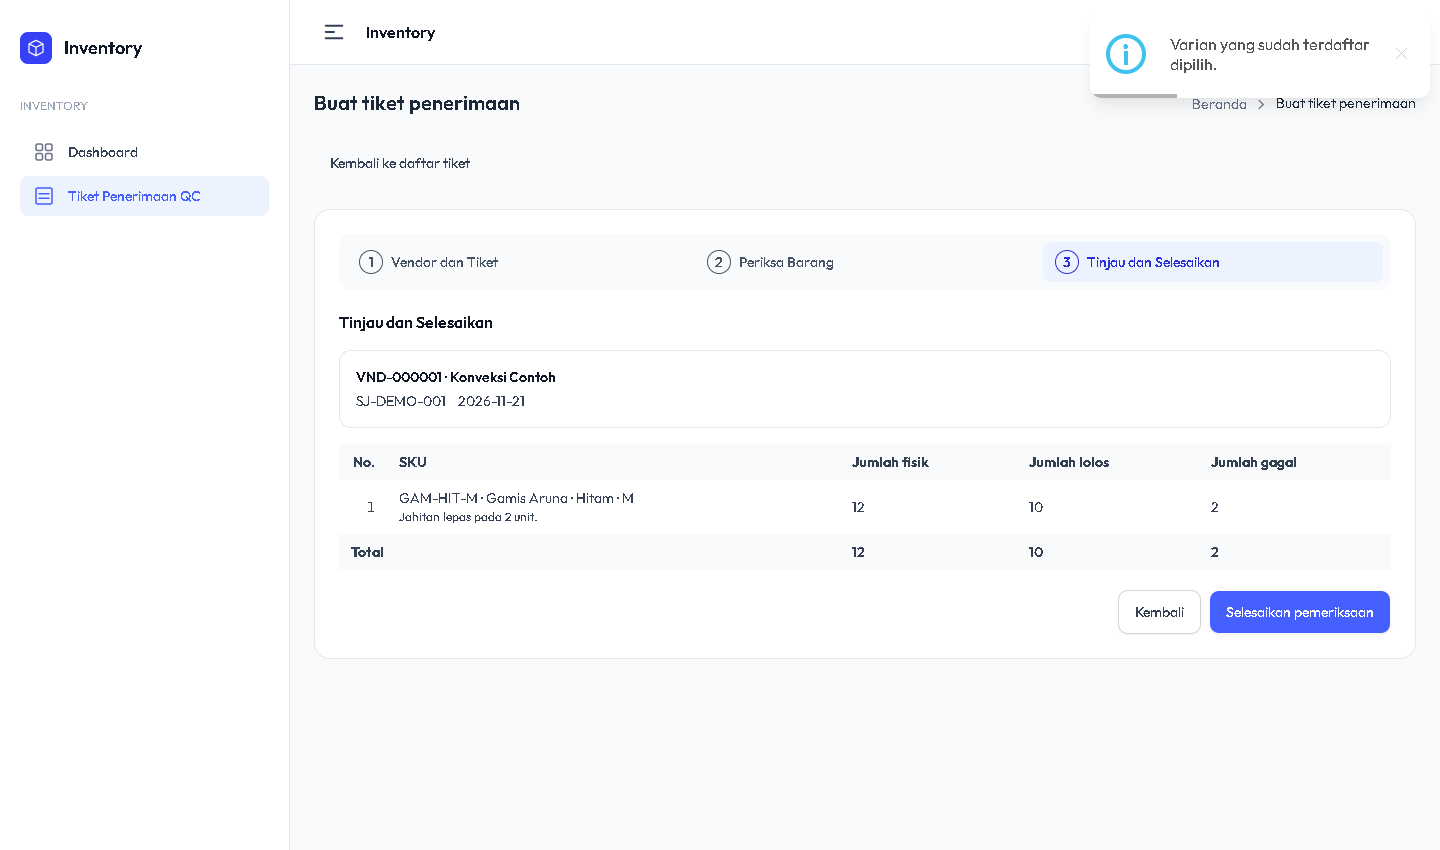
Select Next. Review the vendor, delivery note, and quantities for each SKU. In the example, 10 of 12 units passed. Select Complete inspection to save the ticket. The warehouse can receive the units that passed.
 (opens in a new tab)
Review of the inspection totals before saving -
Open the reports and share the ticket QR
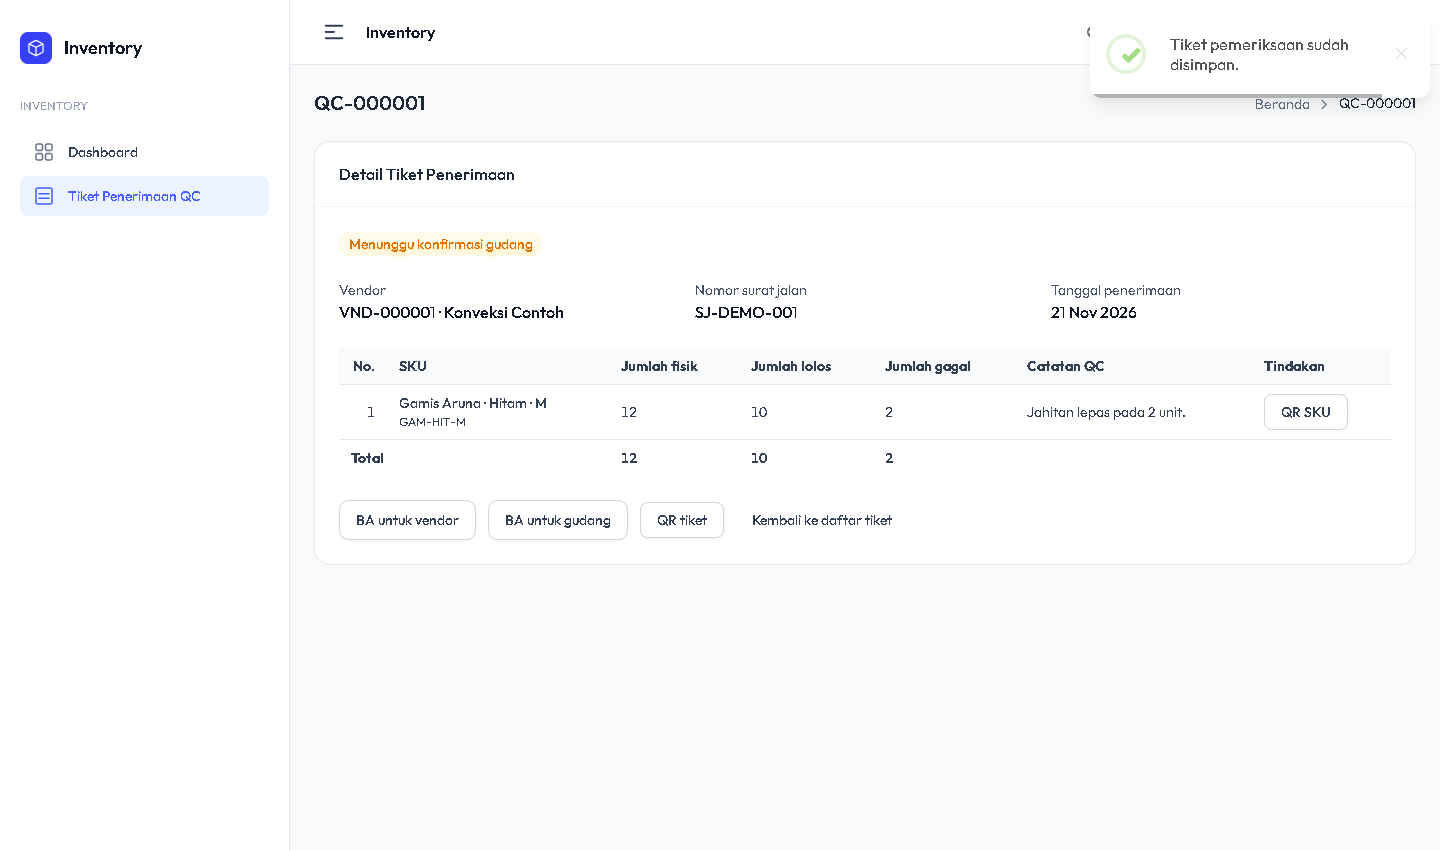
Open the vendor report for the inspection results. If any items passed, open the warehouse handover report and select Ticket QR to download the label for the warehouse. To reopen a saved ticket, search the QC Receiving Tickets table or scan its QR.
 (opens in a new tab)
Saved QC ticket with vendor and warehouse reports 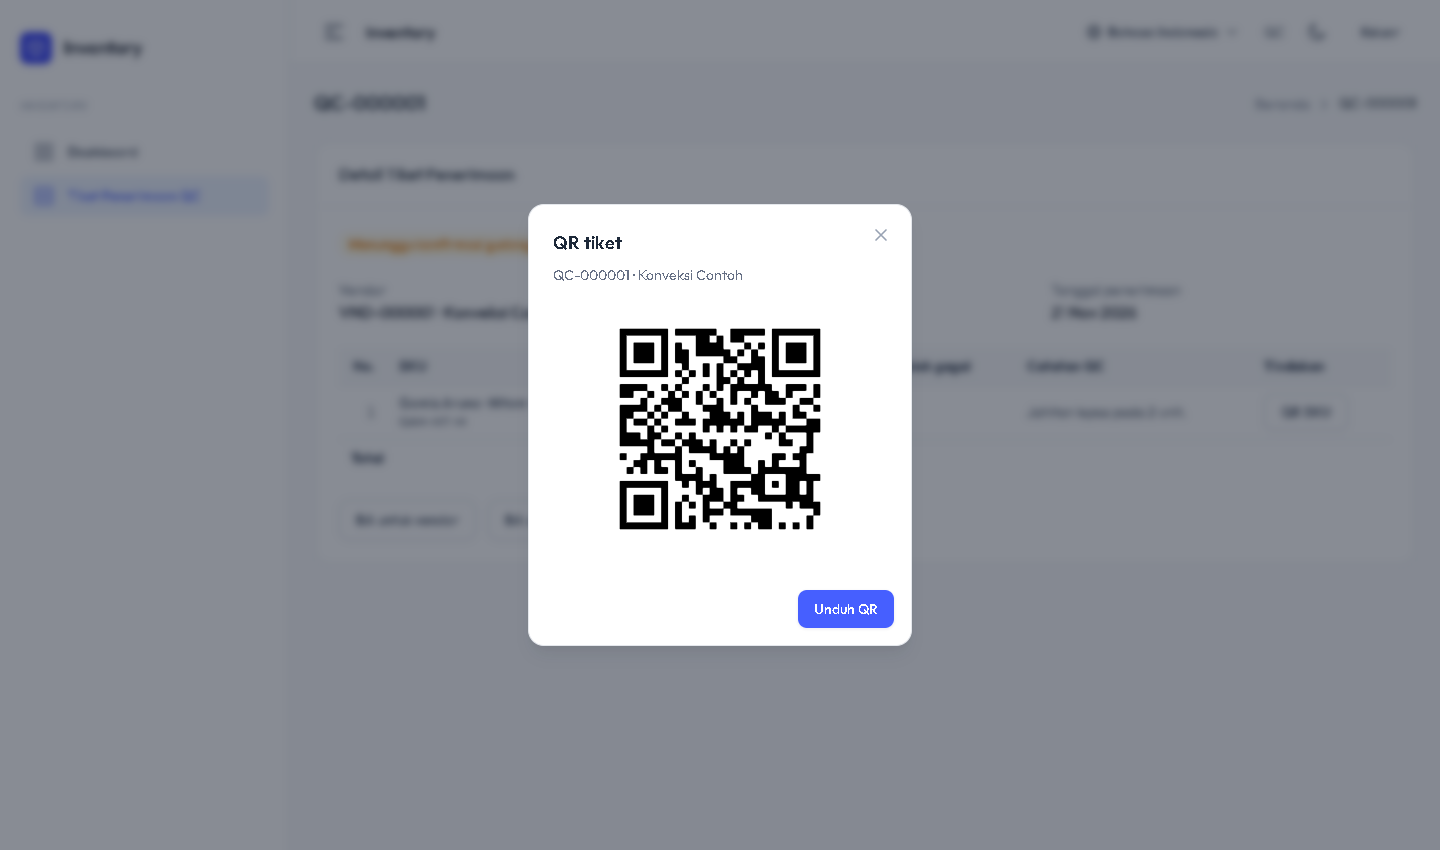 (opens in a new tab)
QC ticket QR ready to download
Warehouse
Back to top-
Scan the QC ticket and receive the goods
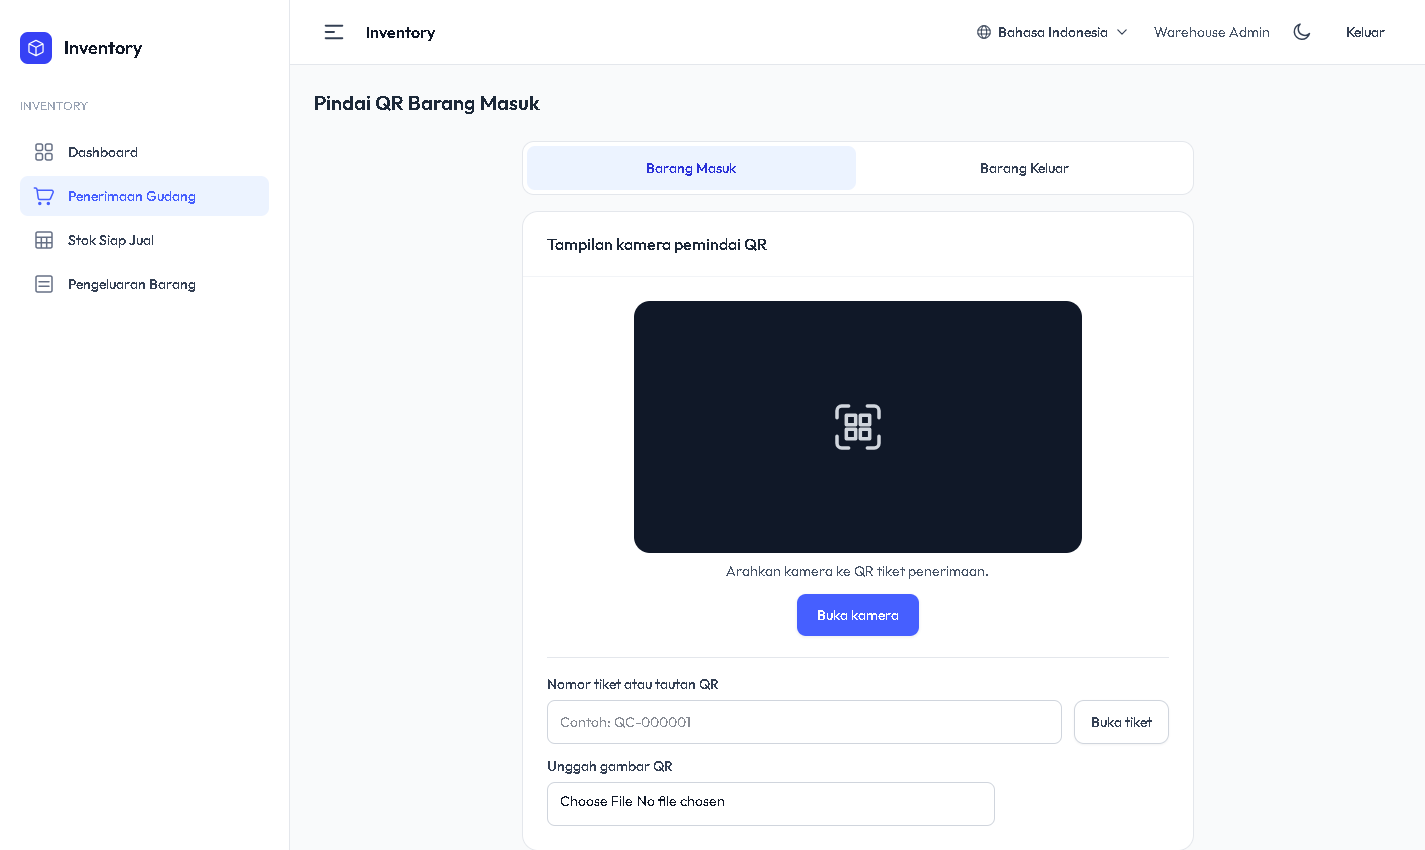
Open Warehouse Receiving, then select Scan Receiving QR. Use the camera, upload the QR image, or enter the ticket number. Compare the physical items with the quantities that passed QC, then select Receive into warehouse to add the stock.
 (opens in a new tab)
Receiving scanner with upload and ticket-number options 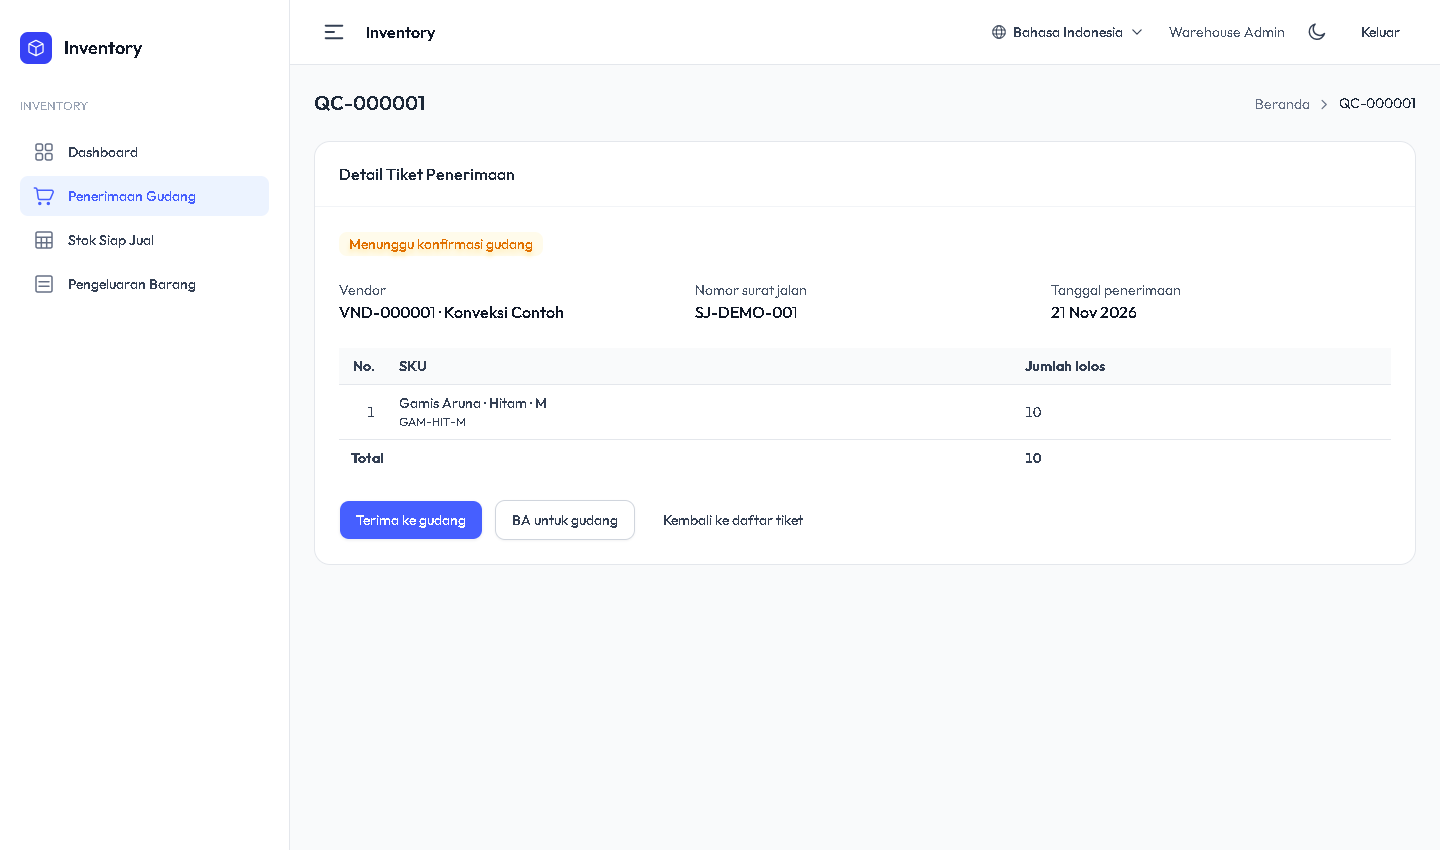 (opens in a new tab)
Items that passed QC and the warehouse receive button -
Open the CS request and start packing
Open the outgoing ticket from the request list. Check the SKU and quantity, then select Confirm and Start Packing. Print the outgoing ticket QR label and place it on the package.
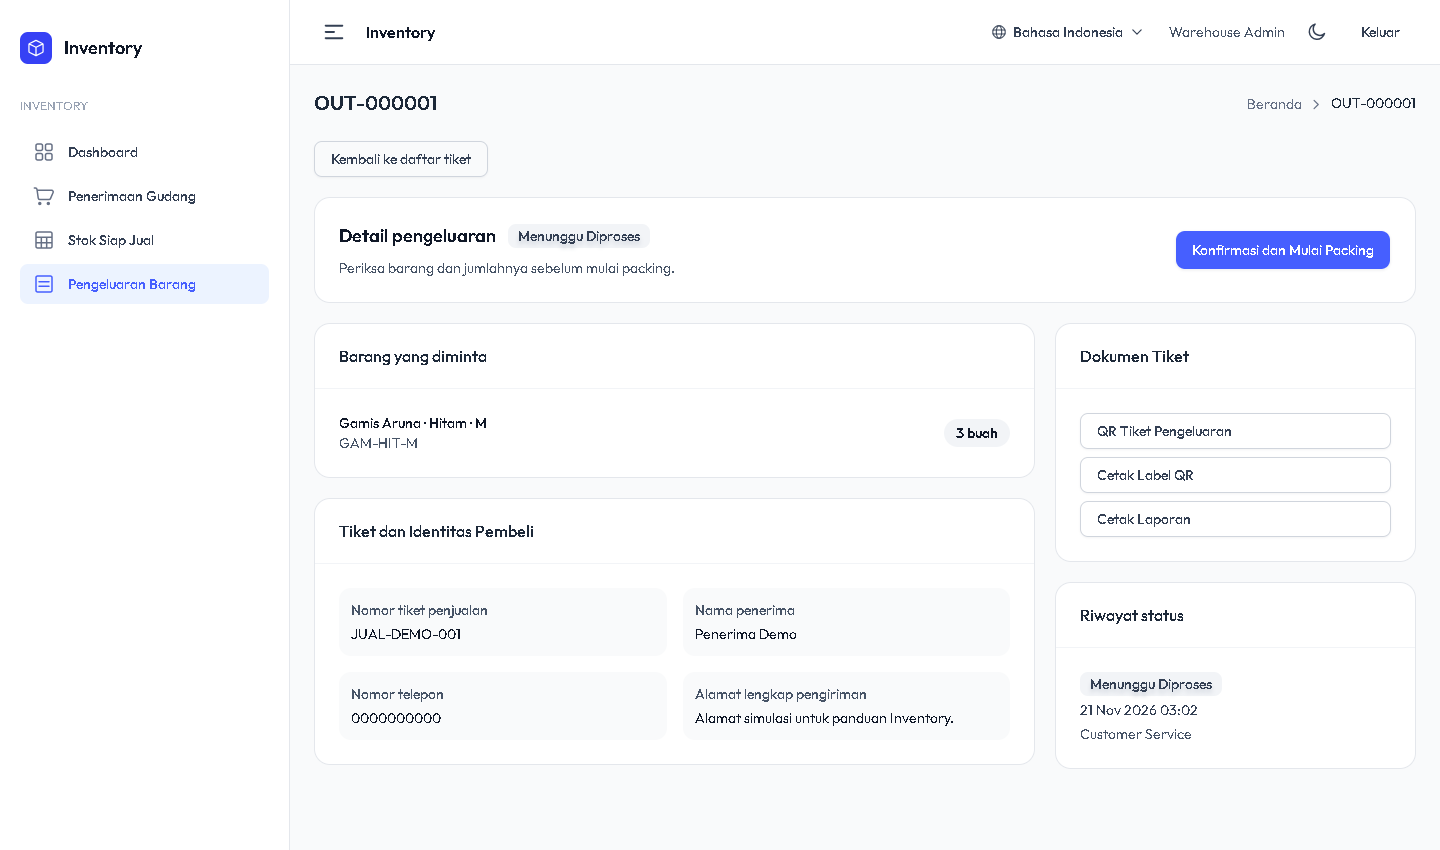 (opens in a new tab)
Outgoing request ready to be processed by the warehouse 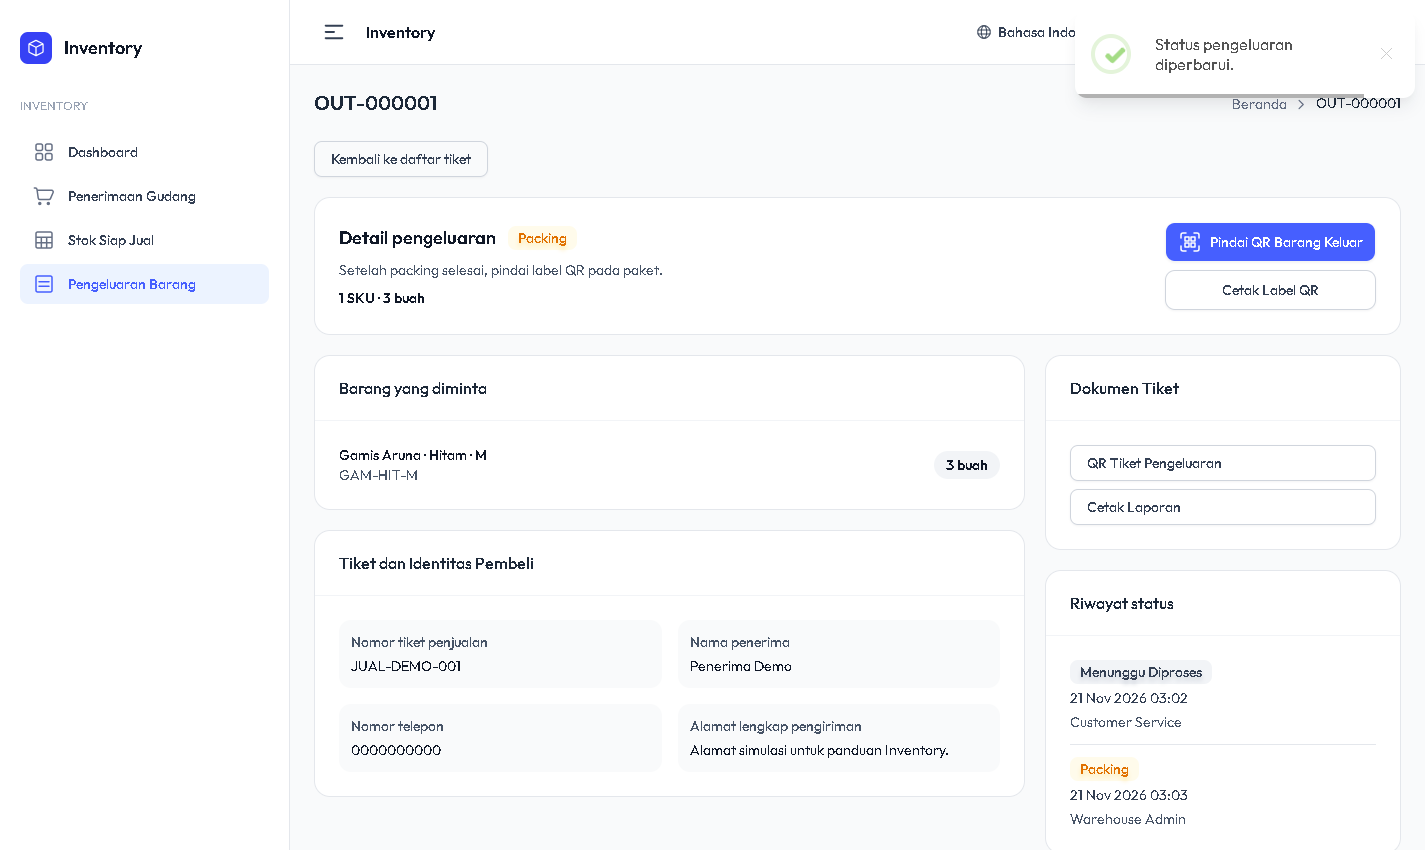 (opens in a new tab)
Packing status and the QR label print button -
Scan the package to mark packing complete
After packing, open Scan Outgoing QR and scan the package label. Select Confirm Packing Complete. The ticket moves to Ready for Delivery.
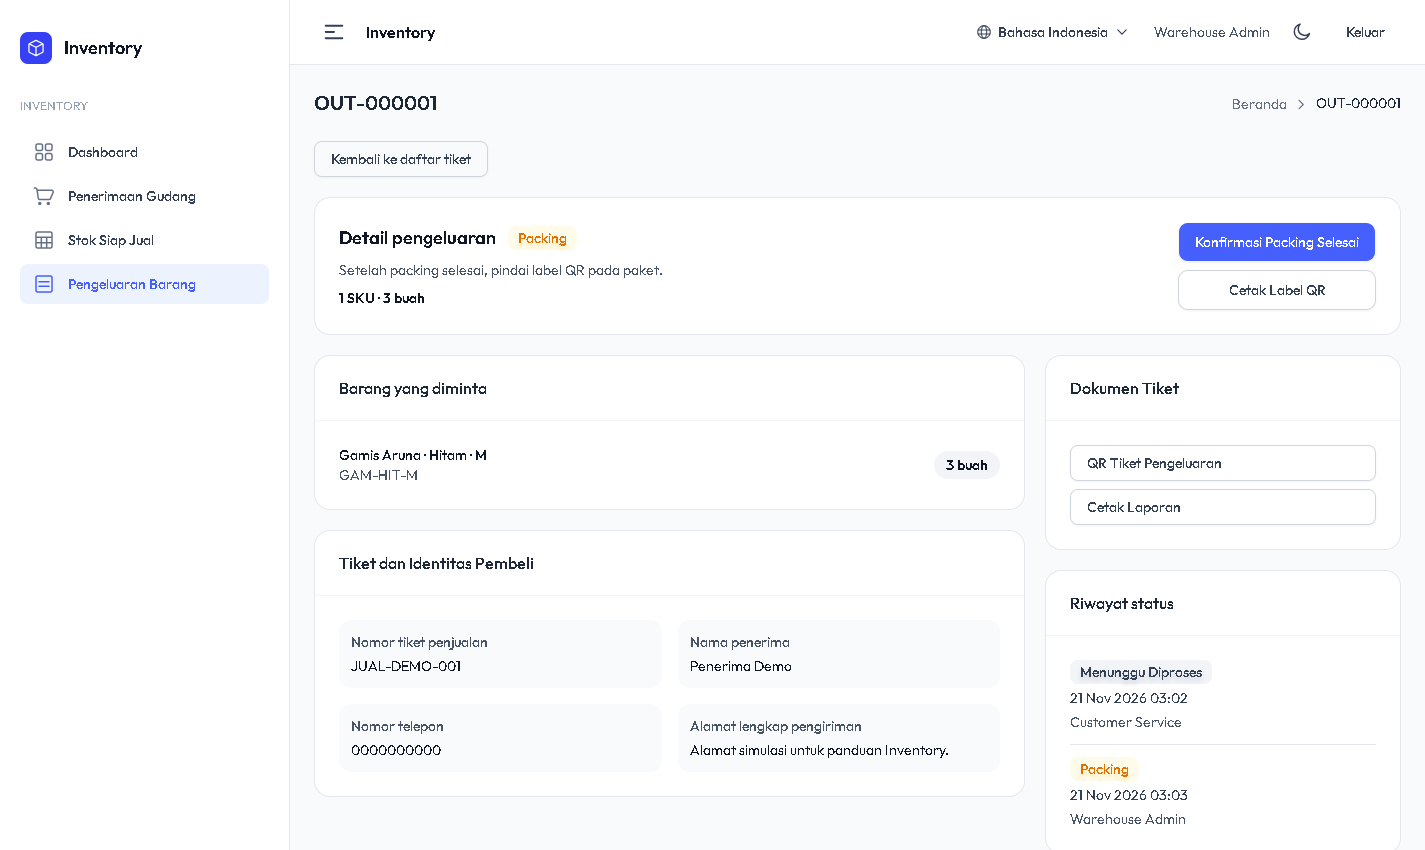 (opens in a new tab)
Packing confirmation available after a QR scan -
Confirm the handover to the courier
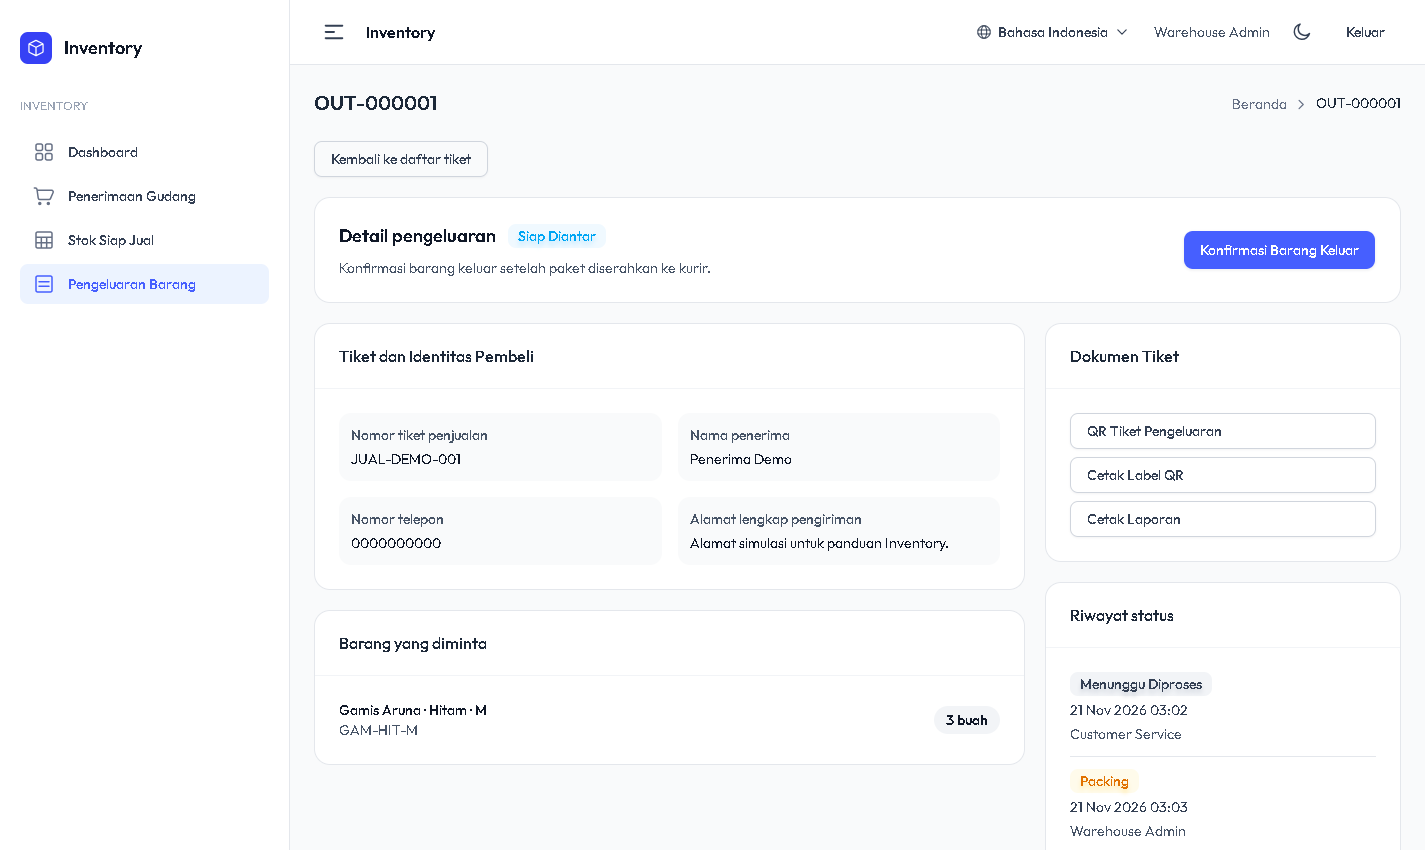
When the courier takes the package, scan the same QR again. Select Confirm Goods Out and approve the confirmation. Inventory deducts the quantity from physical stock and marks the ticket as Shipped for CS to see.
 (opens in a new tab)
Outgoing confirmation for a package ready to ship
Customer Service (CS)
Back to top-
Check stock before creating a request
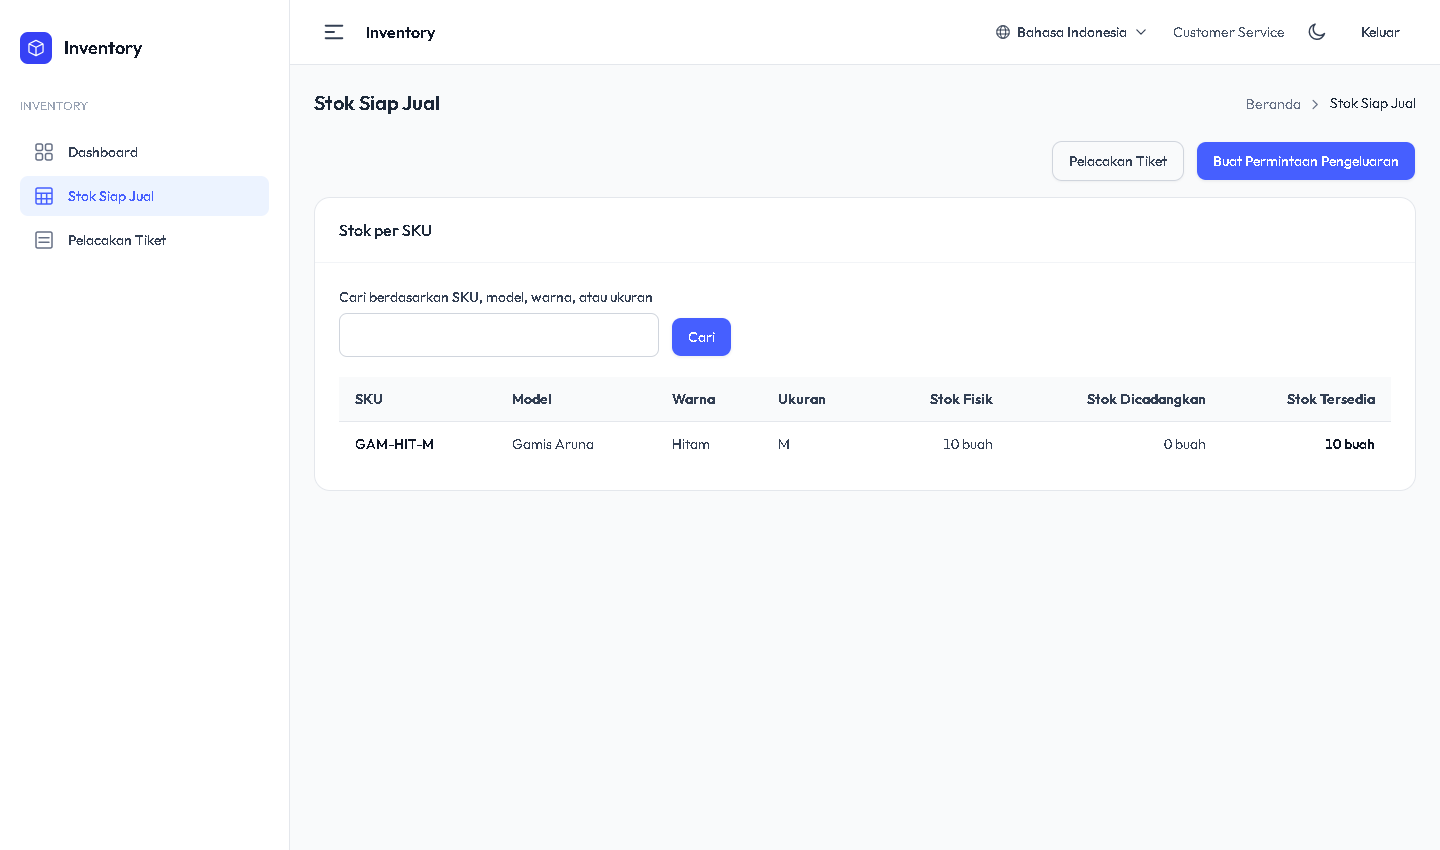
Open Ready-to-Sell Stock. Search by SKU or product name and check the available quantity for each variant the customer ordered.
 (opens in a new tab)
Ready-to-sell stock after the warehouse confirms receipt -
Enter the sales ticket and recipient details
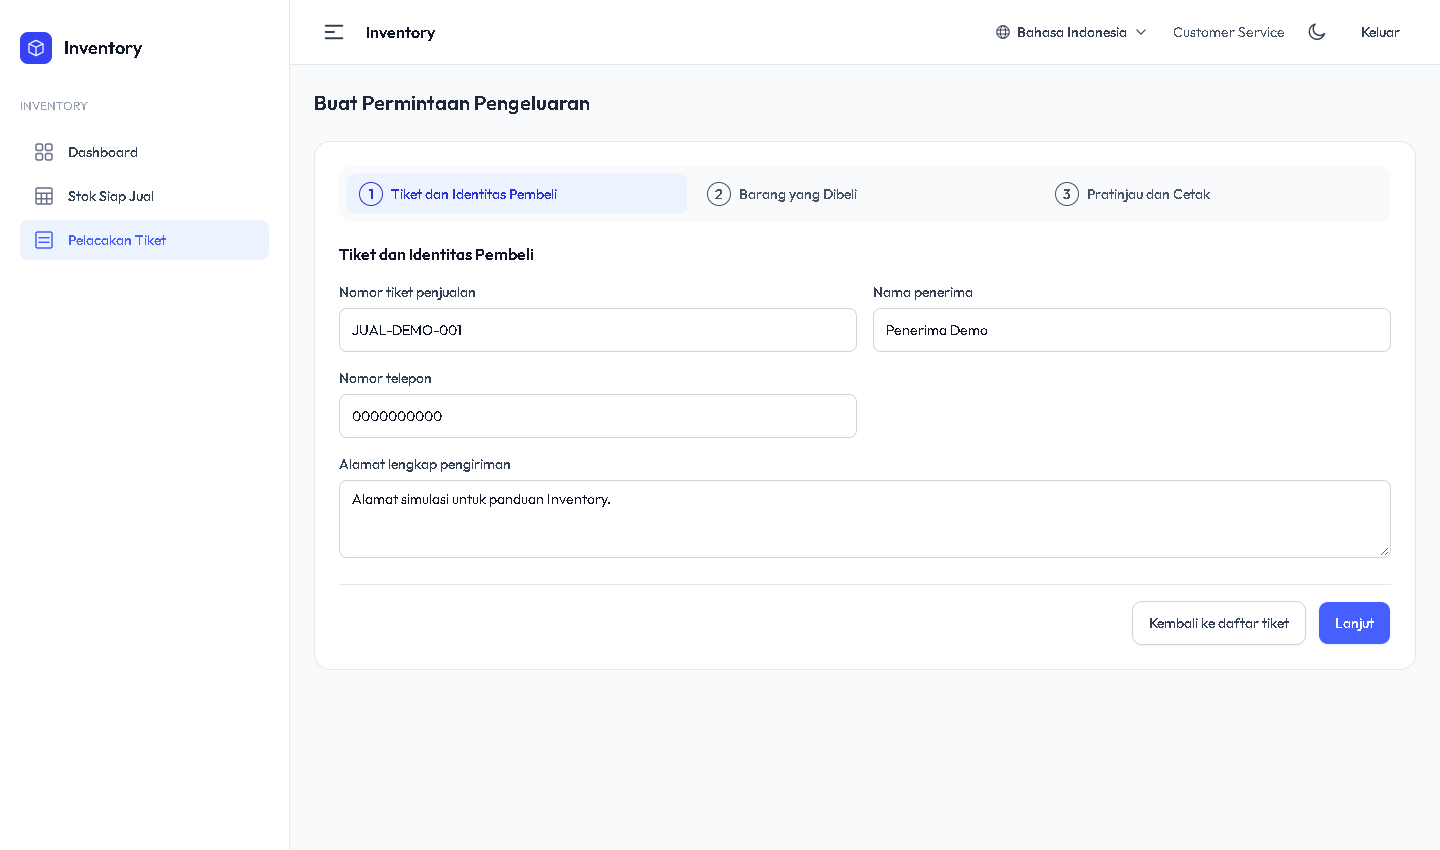
Select Create Dispatch Request. Enter the sales ticket number, recipient name, phone number, and complete address. Use one ticket for all items sent to the same recipient and address.
 (opens in a new tab)
Sales ticket number and sample recipient details -
Add purchased items and review the request
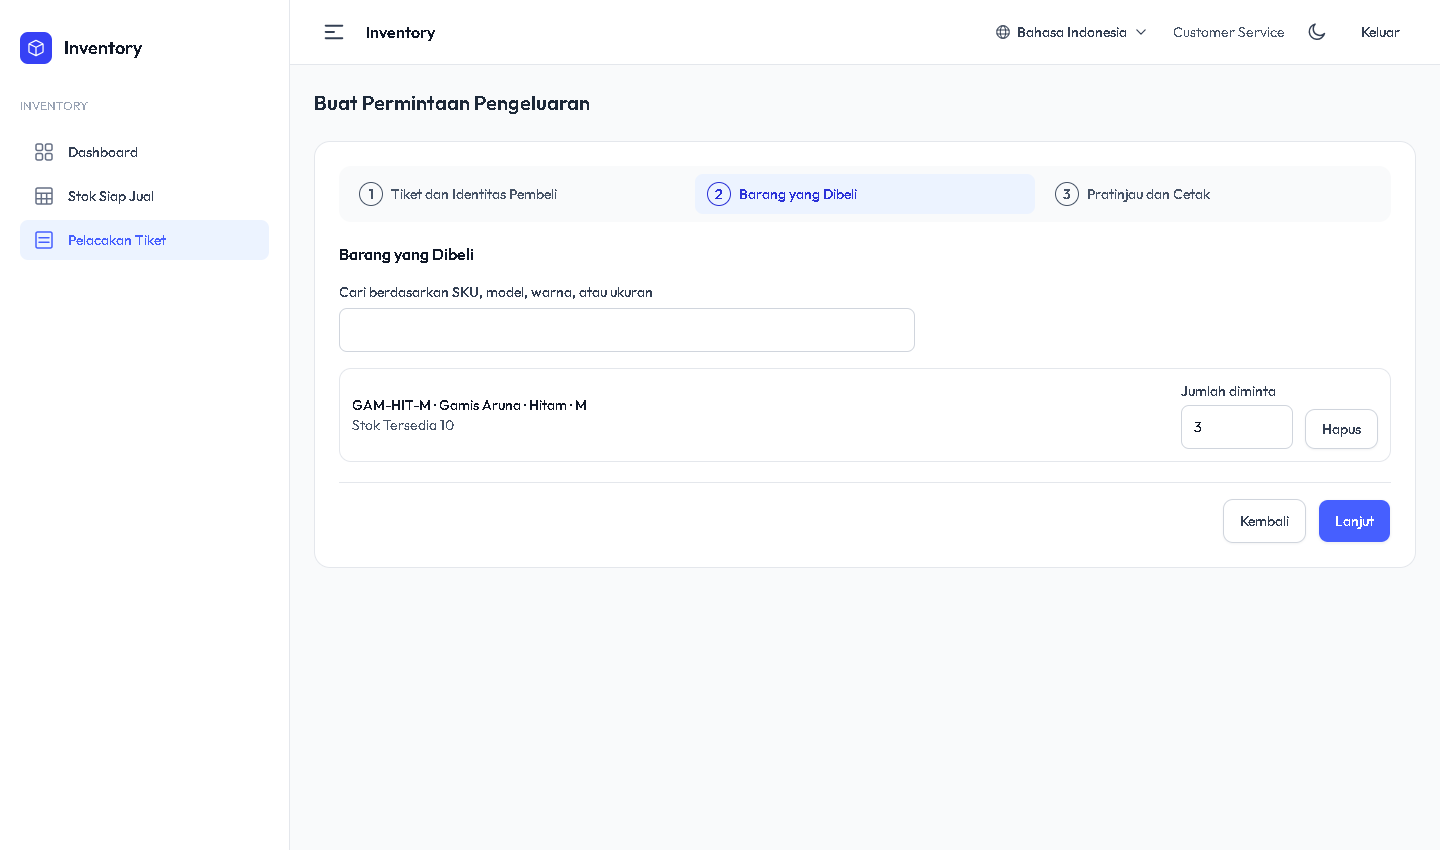
Select Next, search for a product, and set its quantity within the available stock. Repeat for other items. Continue to preview, check the address and quantities, then select Create Ticket. Inventory checks availability again when saving.
 (opens in a new tab)
Purchased variant, available stock, and requested quantity 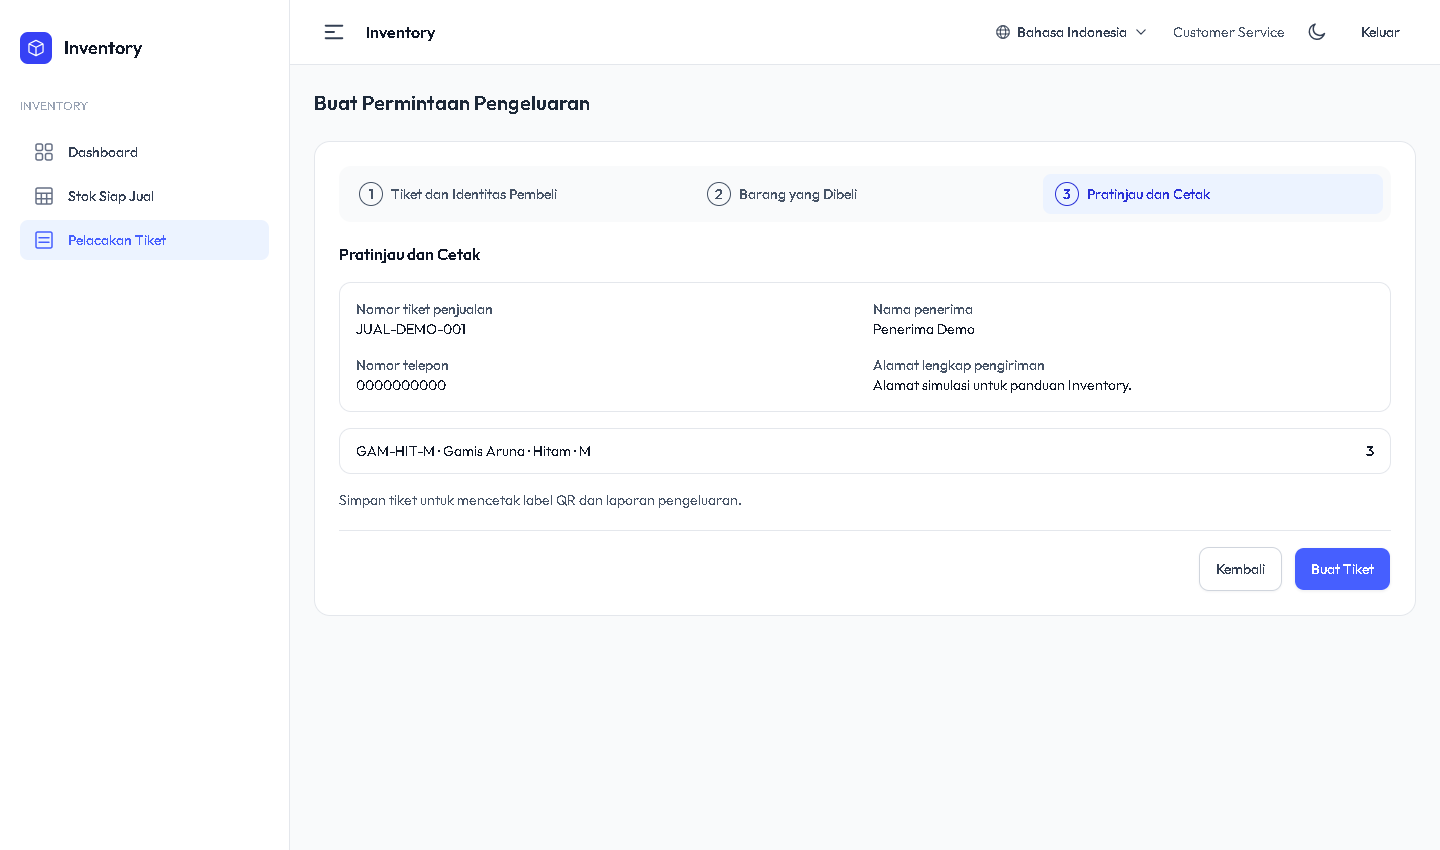 (opens in a new tab)
Request preview before submitting the ticket -
Open the QR, print the report, and track the ticket
The saved ticket contains the outgoing ticket QR, printable QR label, and dispatch report. Open Ticket Tracking and search by ticket number to follow its status from Pending through Packing and Ready for Delivery to Shipped.
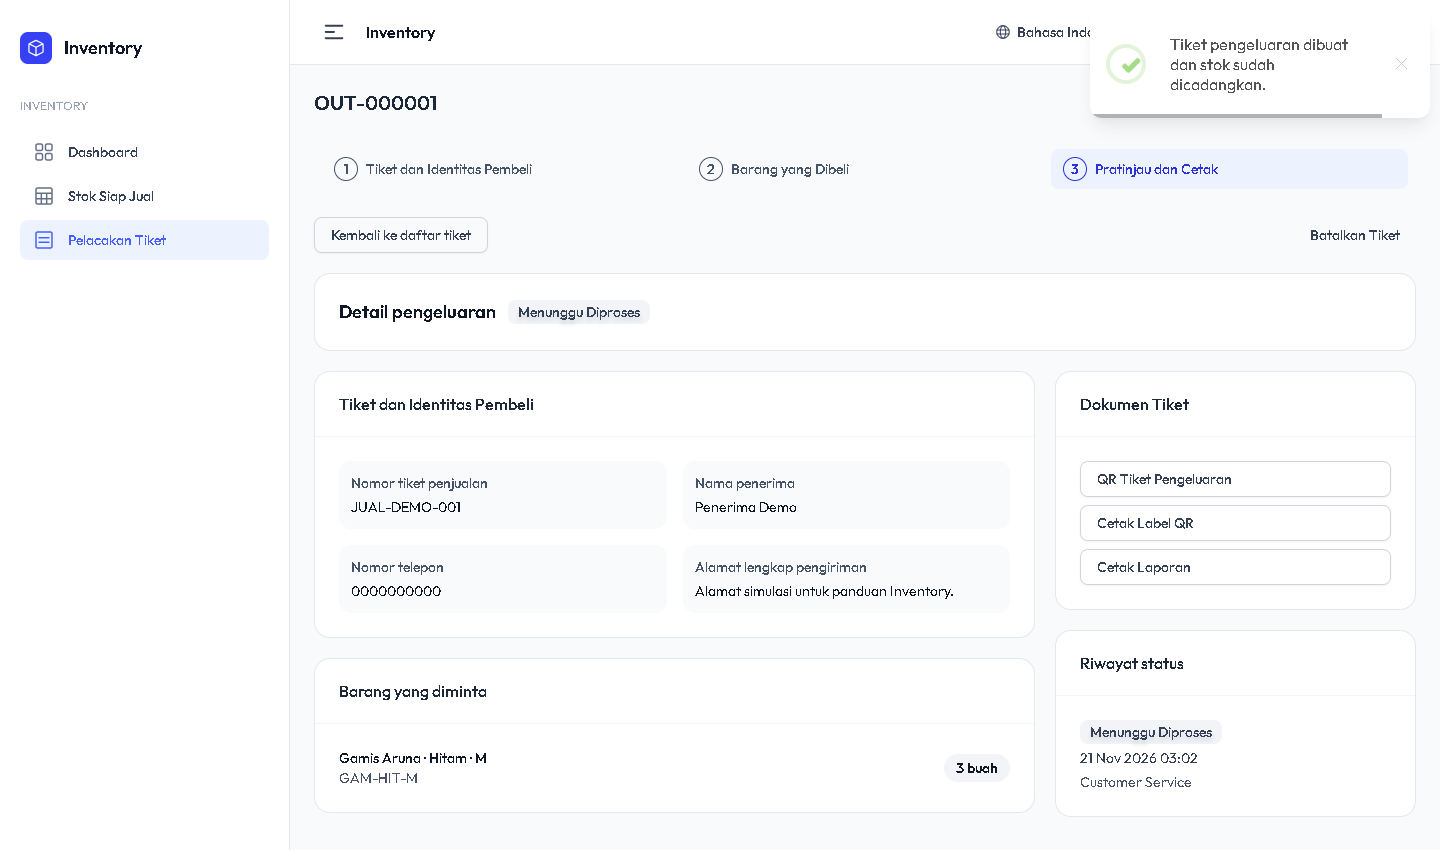 (opens in a new tab)
Saved request with a QR and printable report 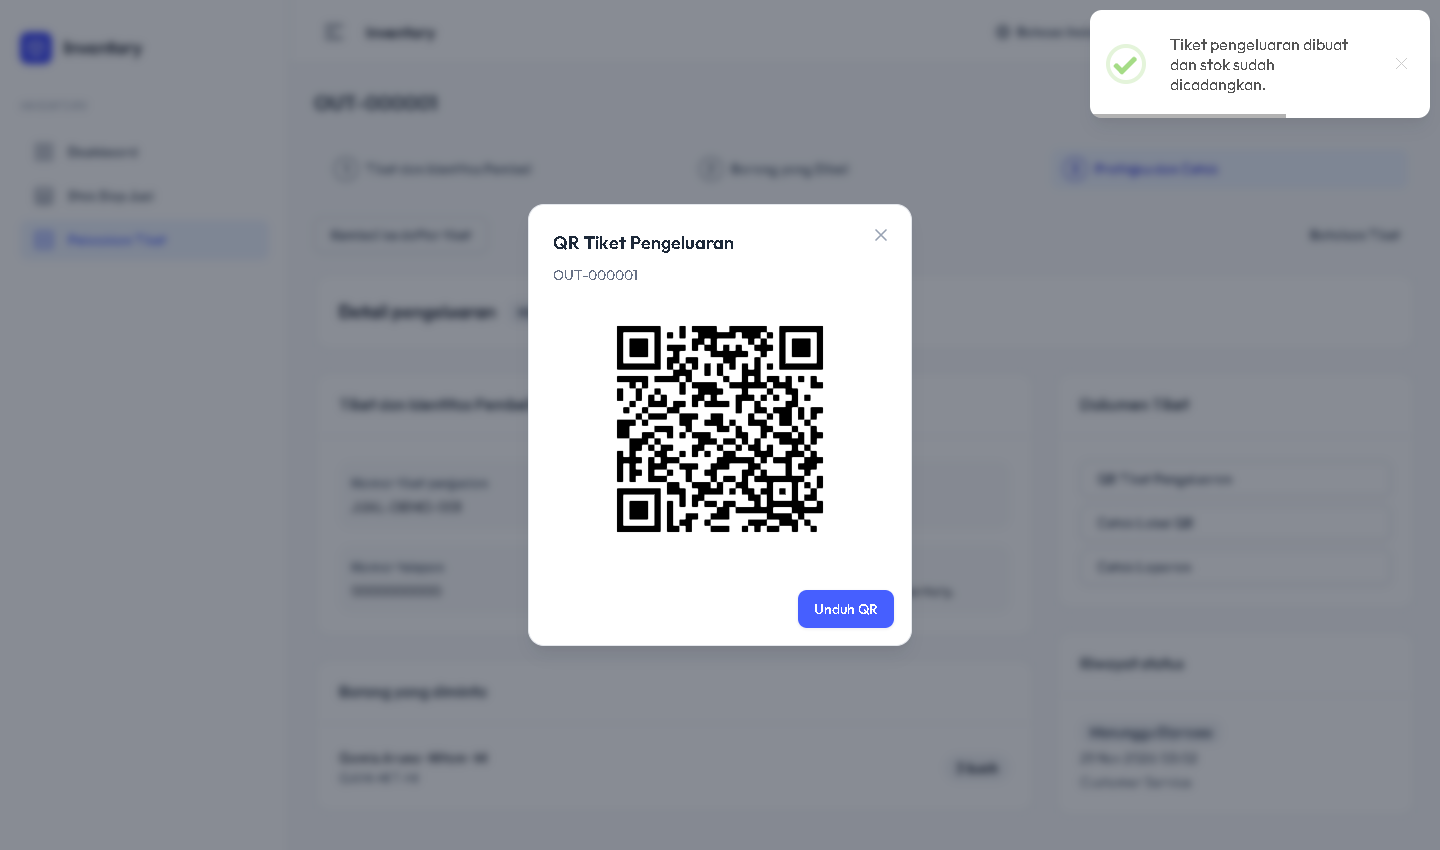 (opens in a new tab)
Downloadable outgoing ticket QR 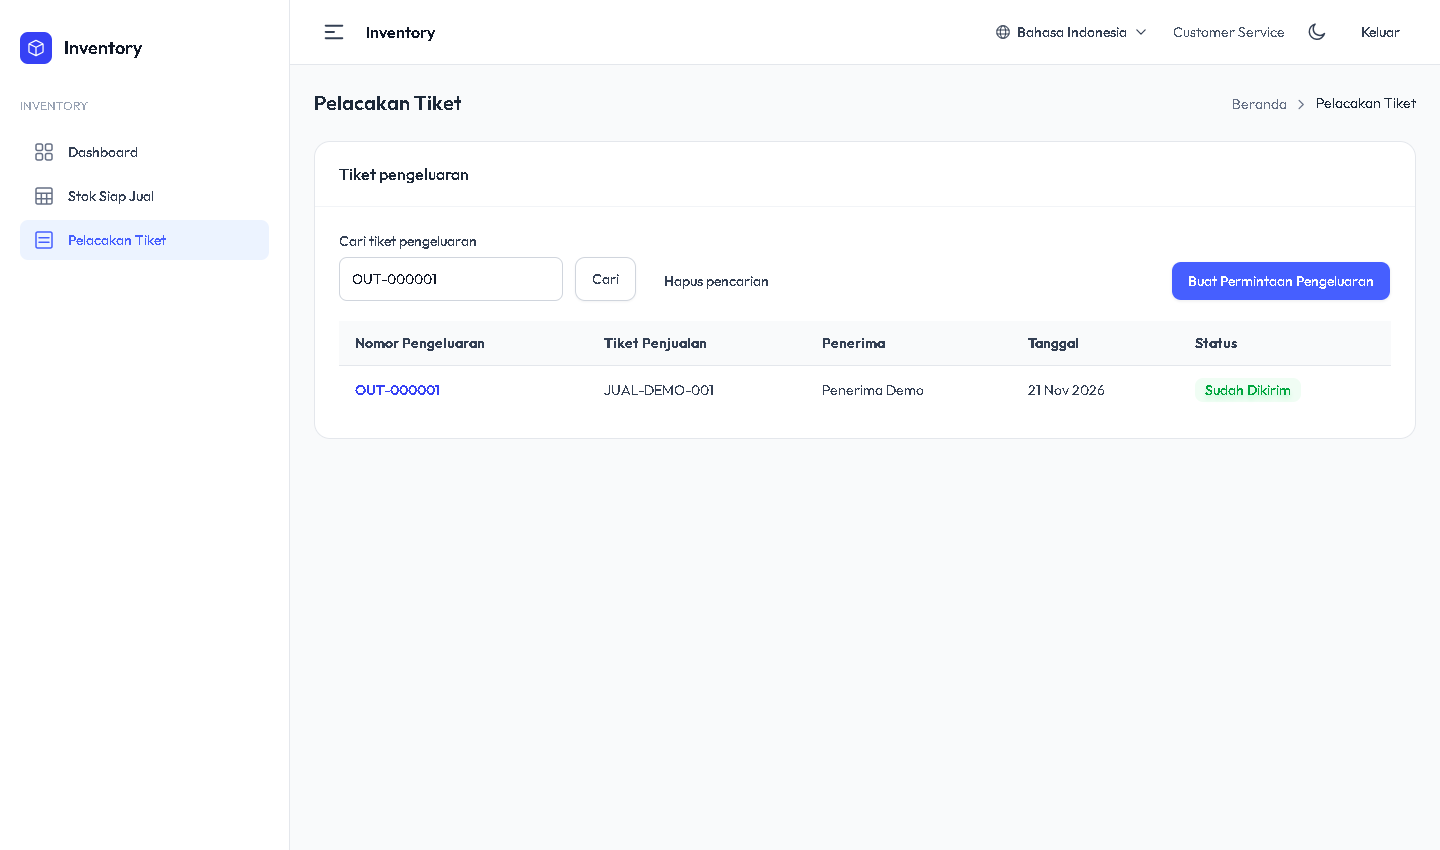 (opens in a new tab)
Ticket Tracking search with the order marked as shipped 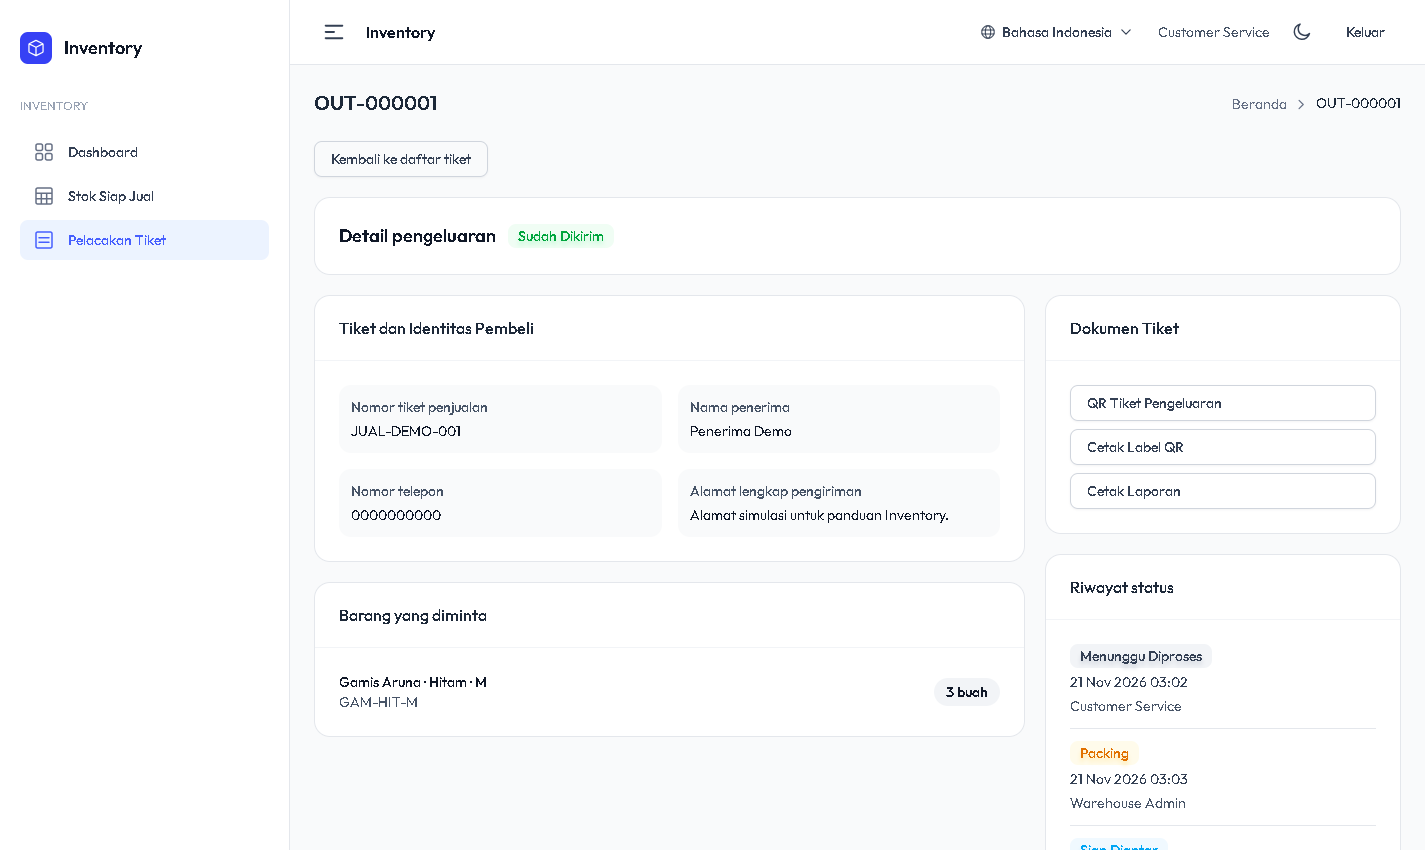 (opens in a new tab)
Tracked outgoing ticket marked as shipped